Red Kidney Bean Curry – Rajma Curry

Red Kidney Bean Curry3

Mea culpa! On Sunday, my trigger happy finger clicked the Publish button by mistake and my subscribers received a unintentional sneak preview of the pictures for Tuesday’s blog post. I hope it built up the anticipation for today’s recipe!

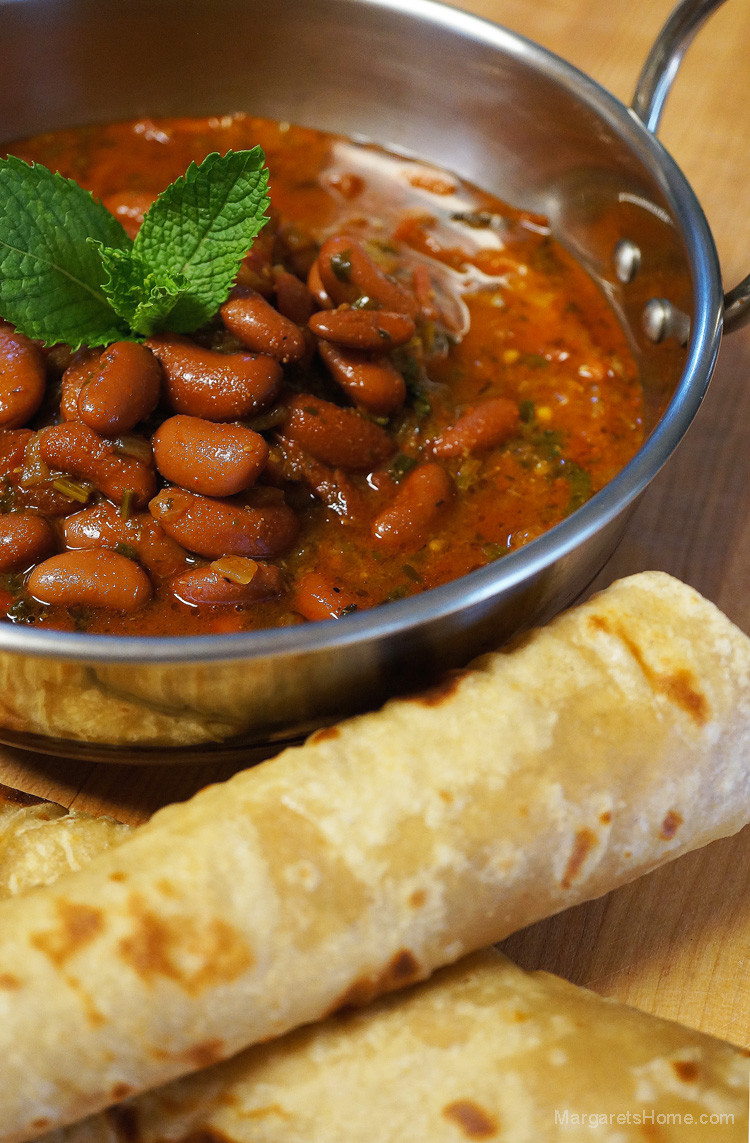
Red kidney bean curry, which is called rajma in Hindi, is a traditional dish prepared in almost every home in India. It is served with rice or whole wheat bread. Red kidney beans are naturally gluten free, nutritious, and well suited for those on a vegan or vegetarian diet. It is a great source of protein and good for lowering cholesterol because of its fiber content.

This recipe is ideal for a quick weeknight meal since you’ll be using canned kidney beans and spices that are already on your kitchen shelves. You can also make this dish with dried red kidney beans, but you’ll need to soak the beans overnight and then cook them in a pressure cooker the next day.

Please note that you can adjust the heat level of any recipe that I share with you, by lowering or raising the amount of green chillies, crushed red pepper flakes, black pepper, garam masala powder, or red chilli powder. The recipe below has a higher heat level, so you may wish to adjust the level to suit your family.

I wanted to take this opportunity to thank all of you that take the time to comment and “like” my blog. You inspire me to learn, teach, and share.

Red Kidney Bean Curry
Prep time: 8 minutes
Cooking time: 25 minutes
Serves: 4

Ingredients:
1lb 13 oz (822 grams) red kidney beans
3 tablespoons vegetable oil
1 bay leaf, (tej patta)
2 black cardamoms
1-inch piece cinnamon
2 cups finely chopped onion
salt
2 tablespoons ginger-garlic paste
2 cups diced tomatoes
3 green chillies, (slit down the center – adjust depending on heat and your preference)
1 teaspoon whole cumin seeds
½ teaspoon turmeric powder
2 teaspoons Kashmiri chilli powder, (depending on heat and your preference)
1 teaspoon crushed red chilli flakes, (depending on heat and your preference)
1 tablespoon coriander powder
2 teaspoons garam masala, (depending on your preference)
3 teaspoons kasori methi, (crushed in your palm)
1 cup warm water
¼ cup finely chopped cilantro
3-4 mint leaves, (torn into bits)

Directions:
Heat a heavy bottomed pot on medium-high heat. Add oil and when it shimmers add the bay leaf, black cardamoms, and cinnamon. After 30 seconds add the chopped onion and salt. Fry until the onion turns light brown. Lower the heat to medium and add the ginger-garlic paste. Fry until the raw smell of ginger-garlic disappears, then add the tomatoes and green chillies. Cook until you see the oil separate from the tomato-onion mixture.

Add cumin seeds, turmeric powder, chilli powder, crushed red chilli flakes, coriander powder, garam masala powder, and kasori methi. Cook for 30 seconds and then add the canned red kidney beans along with the liquid in the can and one cup of warm water. Turn the heat to high and let the beans come to a boil. Once it comes to a boil, turn the heat to low, and let the beans simmer for 15-20 minutes. Garnish with cilantro and mint. Serve with plain steamed rice or rotis.

Egg Biryani

Egg Biriyani1

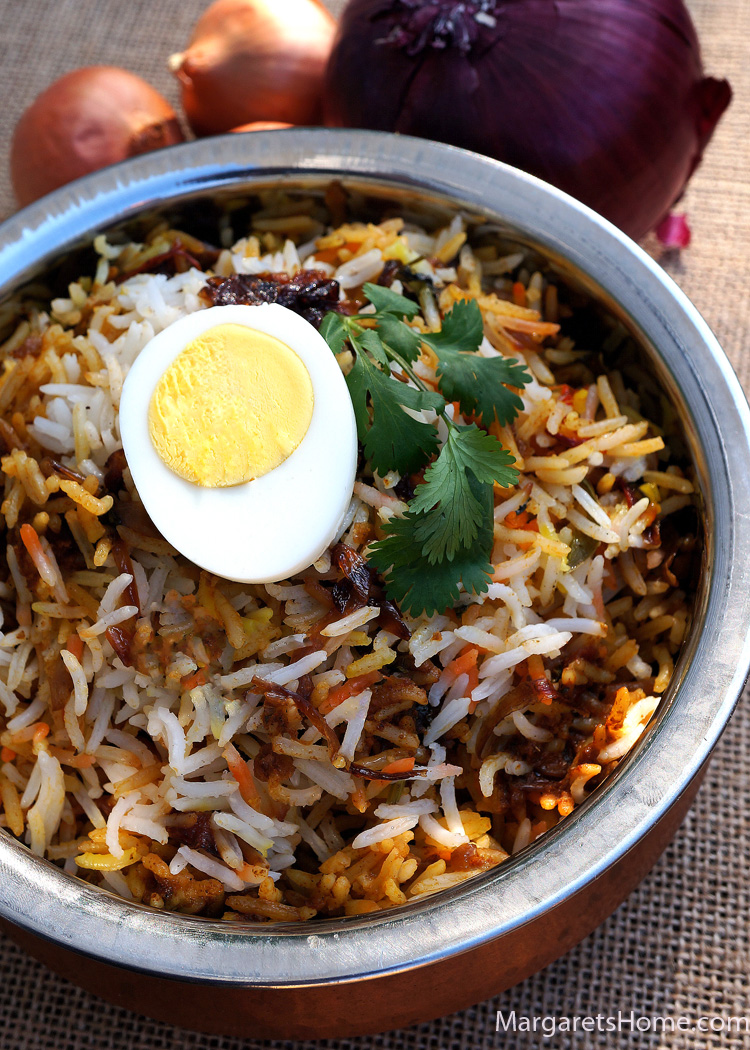
Biryani is one of the most famous dishes that has come down to us from the kitchens of the Mughal Emperors. Being artistic in nature, the Mughals looked on cooking as an art. It was brought to South Asia by travelers and merchants. There are many stories about the origin of biryani but this is the one that I like best! It is said that when Mumtaz Mahal (the beloved empress of Shah Jahan, and in whose memory the Taj Mahal was built) paid a visit to the Indian army barracks she found the soldiers weak and undernourished. She asked the chef to prepare a dish that combined both meat and rice which would provide a balance of rich nutrition and protein and “biryani” was born. Biryani is a rice based dish made with a blend of aromatic spices and a choice of chicken, mutton, fish, beef, eggs or vegetables.

There are many varieties of biryanis and different ways of preparing it. I thought we would start with a basic egg biryani recipe and then slowly graduate to the more complex biryani recipes. In this recipe we use “potli ka masala,” which is the Indian version of a “bouquet garni.” It is unlike a bouquet garni in that the spices are tied in a muslin cloth with a piece of string and used in the cooking process. It is then discarded before the dish is finally completed.

The potli ka masala used to make different kinds of biryani contain over 20 aromatic herbs and spices and can be bought in a well stocked Indian or Pakistani grocery store. For this simple egg biryani, I put seven spices in a small piece of cheese cloth and tied the mouth with a piece of string. I used it to infuse flavor to the boiling water in which the rice was cooked. The list of ingredients may seem long and the directions lengthy, but try this recipe and I am sure you will be pleased with the results.

Egg Biryani
Prep time: 20 minutes
Cooking time: 60 minutes
Serves: 5-6

For Egg Masala
Ingredients:
6 eggs
3 tablespoons ghee
2 whole star anise
2 petals of mace
1 2-inch piece of cinnamon, broken in half
2 black cardamoms
2 cups finely chopped onion
salt
2 tablespoons ginger-garlic paste
3 green chillies, slit in half (optional)
½ teaspoon turmeric powder
2 teaspoons chillie powder, (depending on heat and your preference)
1 tablespoon cumin powder
1 tablespoon coriander powder
1 teaspoon garam masala powder
2 cups diced tomatoes
¼ cup yoghurt
2 tablespoons finely chopped cilantro
5 mint leaves, torn into bits

Directions:
Place the eggs in a saucepan and add enough cold water to cover them. When the water comes to a boil, immediately turn off the heat. Cover with a lid, and let the eggs sit in the pan for 15 minutes. Remove the eggs from the pan and put them in a bowl. Allow to rest for two minutes and when the eggs are cool enough to handle, remove and discard the shell. Slice each egg in half and set aside.

Heat ghee in a large, wide, heavy-bottomed pot over medium-high heat. Add star anise, mace, cinnamon, cardamom and let the spices infuse the ghee with their essence for one minute. Next, add onion and salt and fry until the onion turns light brown. Add ginger-garlic paste, and green chillies. Cook until the raw smell disappears. Then add the turmeric, chillie cumin, coriander, and garam masala powder. Fry for one minute and add the tomatoes. Cook until the oil separates from the tomato mixture. Add the yoghurt, cilantro, and mint. Stir well. Add the egg halves and mix gently so that the eggs stay intact and are well coated with the tomato mixture. Cover and set aside until the rice is ready. You will use this pot to create the layers for the biryani.

For the Rice


Ingredients:
2½ cups Basmati rice
8 cups of water
salt
1 teaspoon of ghee
1 teaspoon caraway seeds, (shah jeera)
1 bay leaf
3 green cardamoms
2 black cardamoms
6 cloves
12 black pepper corns
1 2-inch piece of cinnamon
2 marathi mogga, (optional)

Directions:
In a small piece of cheese cloth add bay leaf, green cardamoms, black cardamoms, cloves, pepper, cinnamon and marathi mogga. Tie it up with a small piece of string. This bundle of spices will be used to flavor the water in which the rice is cooked.

Wash the rice and soak it for 15-20 minutes. Drain the water completely. Add eight cups of fresh water to a large pot. Add salt, ghee, caraway seeds, and the potli ka masala. Place the pot over medium-high heat and bring the water to a boil. Let the water boil for two minutes. Then turn the heat to medium so the water comes to a simmer. Add the drained rice, stir gently and let the rice simmer for 10-12 minutes. Check by pressing a couple of grains of rice between your thumb and forefinger to see if it is cooked. If you find it still has a hard, grainy center, cook for another minute or two. The rice will continue to cook when you are draining it and also when you layer the rice with the egg masala in the next step. Switch off the flame and drain the rice in a colander. Discard the potli ka masala. Gently fluff the rice with a fork.

To Finish the Biryani
Ingredients:
2 tablespoons finely chopped cilantro
6 mint leaves, torn into bits
¼ cup fried onions
¼ teaspoon garam masala powder
a few strands of saffron
¼ cup warm milk
¼ teaspoon orange food color, (optional)
2 teaspoons water
2 tablespoons melted ghee

Directions:
Put the saffron strands into a small bowl, add the warm milk and stir gently. Put the orange food color in another small bowl and add two teaspoons of water to dissolve it.  Set aside.

Take half the egg masala out of the heavy-bottomed pot and keep it in a bowl. Put half the cooked rice over the egg masala that is in the pot. Scatter one tablespoon of cilantro, a few bits of mint and half the fried onions over the rice. Sprinkle half the garam masala powder, and dribble a little saffron milk and a few drops of orange food color over the rice. Arrange the rest of the egg masala over this and add the remaining rice. Sprinkle the rest of the cilantro, mint, fried onion, and garam masala. And finally dribble the rest of the saffron milk and orange food color. Lastly pour melted ghee over the layered egg biryani. Cover the pot with a tight fitting lid and place it over medium heat. When you see the steam escaping, reduce the heat to low and cook for ten minutes.

“Mise en Place” (to put in place)

Mise en Place3

The idea of sharing my cooking routine with you in today’s blog post came to me when my friend asked me the question, “Maggie, how do you cook?”

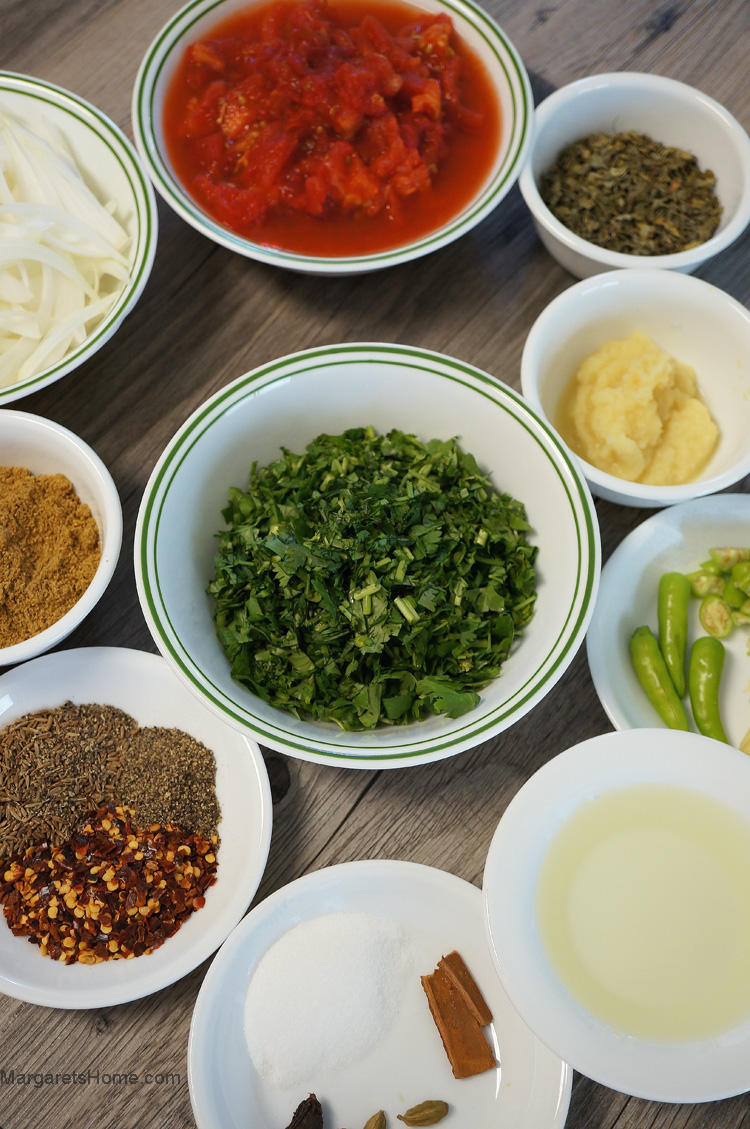
“Mise en place” is a French culinary term which means “to put in place.” I am sure you have eaten at a restaurant where you could watch the chefs at work through a large glass window. You could not have missed seeing all the little containers with herbs and spices, and bottles of sauces close to their work stations. Well, that’s “mise en place” in action. I think that is the most important lesson I learned from watching chefs at work and also watching cooking shows on TV.

Planning and reading a recipe completely is key. There have been a number of times I’ve gone down to the kitchen to bake a cake only to realize that the butter and eggs needed to be at room temperature. Yes, I’ve tried to cheat, but using the microwave to soften the butter and placing the eggs in a warm bath produced a less than perfect cake. There have also been a number of times when I started cooking and found I had an ingredient missing. So, here is how “mise en place” works for me.

1. If I’m using a recipe from a cookbook, blog, or magazine, I read the recipe more than once. Skimming leads to buying wrong ingredients like filo dough instead of puff pastry dough! I keep my recipes, cookbook, or iPad in a well-lit spot, away from my prep area.

2. The process always begins with a clean kitchen.

3. All the dry ingredients like spices, herbs, turmeric, cumin, salt etc. are measured and organized in the order that I’ll need them. If the spices go into the dish I am preparing all at the same time, I put them together on a plate. Cooking utensils are picked and ready for use.

4. I put things back in their place as soon as I finish using them. Spice bottles go back on the shelf as soon as I’ve measured the amount that I need, yoghurt goes back in the fridge, sugar back in the pantry, etc.

5. Next, I do the prep work for fresh herbs and vegetables – chopping, mincing, grating, grinding, blending, etc. Measured ingredients are put into bowls. I keep a small garbage bowl or a plastic bag on my counter to collect scraps for disposal. It makes for an easy clean up.

If I’m baking, I make sure that ingredients that need to be at room temperature are taken out, the oven is preheated, and baking pans are ready.

When I’m cooking Indian food for a large number of guests, I schedule a prep day to get a head start. I make the ginger and garlic paste, clean and wash my cilantro, mint, green chillies, chop my vegetables, cut and marinate meat, fry the paneer, and cook the lentils.

6. I clean up as I go, or if I have some slack time in between cooking. A messy kitchen can be frustrating, so cleaning as you go makes the experience more pleasant.

7. I cook dishes that take the longest first. Then I work  my way down to the easier dishes and those that take the least amount of time to prepare.

8. I have my serving dishes ready.

It is true that many home cooks, like our mothers, didn’t use measuring cups and spoons and had the ability to simply start a recipe and everything just fell into place. Some people just have that talent! For the rest of us, “mise en place” has many benefits. For me, it has made my cooking process quicker, smoother, more enjoyable, and less stressful. Even while writing this piece I had to organize my thoughts like I do ingredients in a recipe. It was like putting “mise en place” in the form of an outline. So, whether you are stepping into the world of cooking for the first time or whether you are an aspiring Food Network Star here’s the secret ingredient to inevitable success –  “mise en place!”

Malaysian Chicken Curry – Nyonya Chicken Curry

Malaysian Chicken Curry4

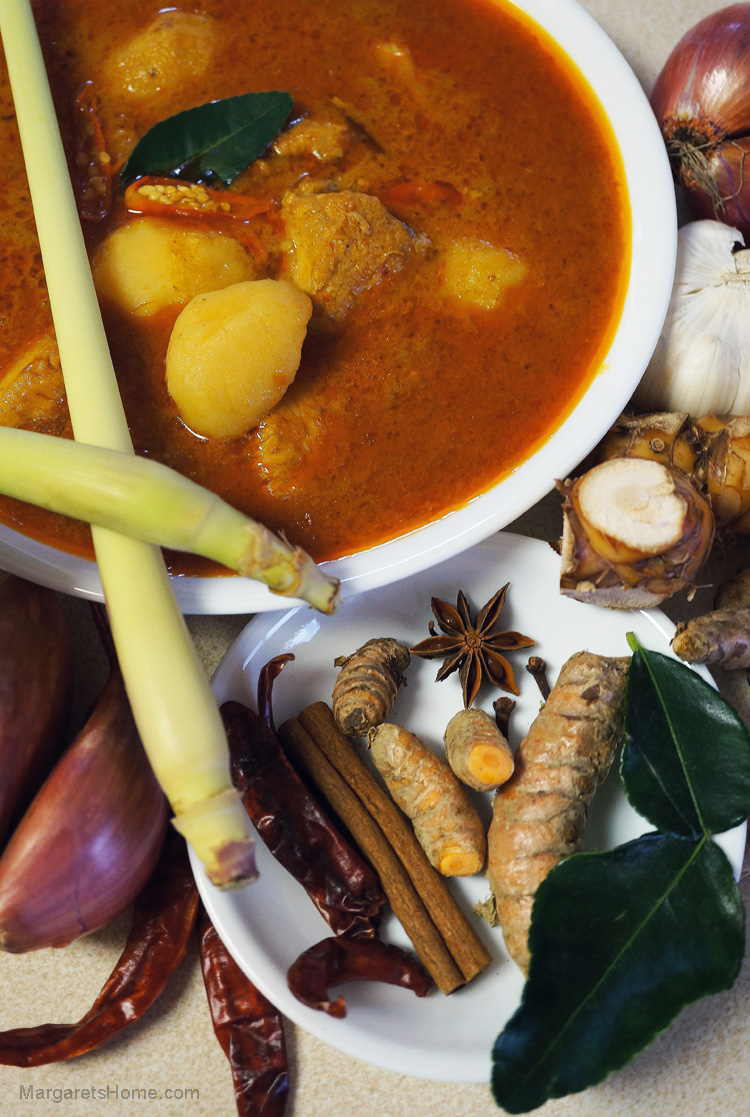
Nyonya chicken curry is one of my all time favorite dishes. I love it and it is worth hunting for all the ingredients that go into making it. Some time ago, I shared my beef rendang recipe, another one of my favorite Malaysian dishes. The next item that I will share with you, from my list of favorite Malaysian recipes, is roti canai.

Nyonya cuisine is a blend of Chinese ingredients with spices and cooking techniques used by the Malay/Indonesian community. They call their wet spice paste rempah. The cooking skill of a new daughter-in-law is judged by listening to her preparing rempah with a mortar and pestle. I definitely wouldn’t qualify as a good cook, because I used a blender to make my rempah!

When I first started experimenting with other world cuisines, many of the herbs, spices and techniques were unfamiliar to me. Some of the ingredients mentioned in this recipe may not normally be on your kitchen shelf or in your refrigerator. But with all the specialty markets springing up these days, it was easy for me to find all these ingredients. Challenge yourself and try cooking this dish. I am sure you, your family, and your friends will be delighted with the results.

Malaysian Chicken Curry – Nyonya chicken curry
Prep time: 30 minutes, (includes time for soaking chillies)
Cooking time: 30 minutes
Serves: 6-8

Ingredients:
½ cup peanut oil
1 star anise
3 cloves
3-inch piece cinnamon, (broken in half)
2 sprigs of curry leaves
3 lbs chicken, (cut into small pieces)
10 baby potatoes, (peeled, halved and parboiled)
2 Thai red chillies, (slit in half)
2 14 fl oz (400 ml) cans of coconut milk
1 kaffir lime leaf
salt
2 teaspoons sugar

For the wet spice paste (Rempah):
4 tablespoons whole coriander seeds
2 teaspoons cumin seeds
2 teaspoons fennel seeds
20 dried red chillies, (broken in half, seeded, and soaked in boiling water)
1 teaspoon fish sauce, (or one piece belacan, broken into bits)
3 tablespoons roughly chopped fresh turmeric root
3 tablespoons finely chopped galangal
3 tablespoons finely chopped lemon grass
2 tablespoons sliced garlic
2 cups roughly chopped shallots or red onions
½ cup water, (or use the water that you soaked the red chillies in)

Directions:
To make the wet spice paste, break the red chillies in half, remove the seeds, and soak them in boiling water for 20 minutes. Drain and save the water to use to grind the paste.

Next, roast the coriander, cumin, and fennel seeds in a small non-stick pan over medium-low heat for five minutes or until they smell fragrant. Cool completely.

Drain the soaked red chillies and put them into a blender. Add the roasted spices, fish sauce or belacan, turmeric root, galangal, garlic, shallots and half a cup of the water that you soaked the red chillies in.  If you forgot to save it just use water. Blend to a smooth puree.

Place a heavy bottomed saucepan over medium heat. Add oil and when it shimmers, add the wet spice paste, star anise, cloves, cinnamon, and curry leaves and sauté for 10 minutes or until you see the paste thicken, darken in color, and the oil separating from the mixture.

Add the chicken, stir until the paste coats each piece. Add potatoes, chillies, coconut milk, kaffir lime leaf, salt, and sugar. Cover and simmer over medium heat for 20 minutes or until the chicken and potatoes are cooked. Roti canai is the perfect accompaniment to this Malaysian chicken curry.

Paneer Makhani

Paneer Makhani5
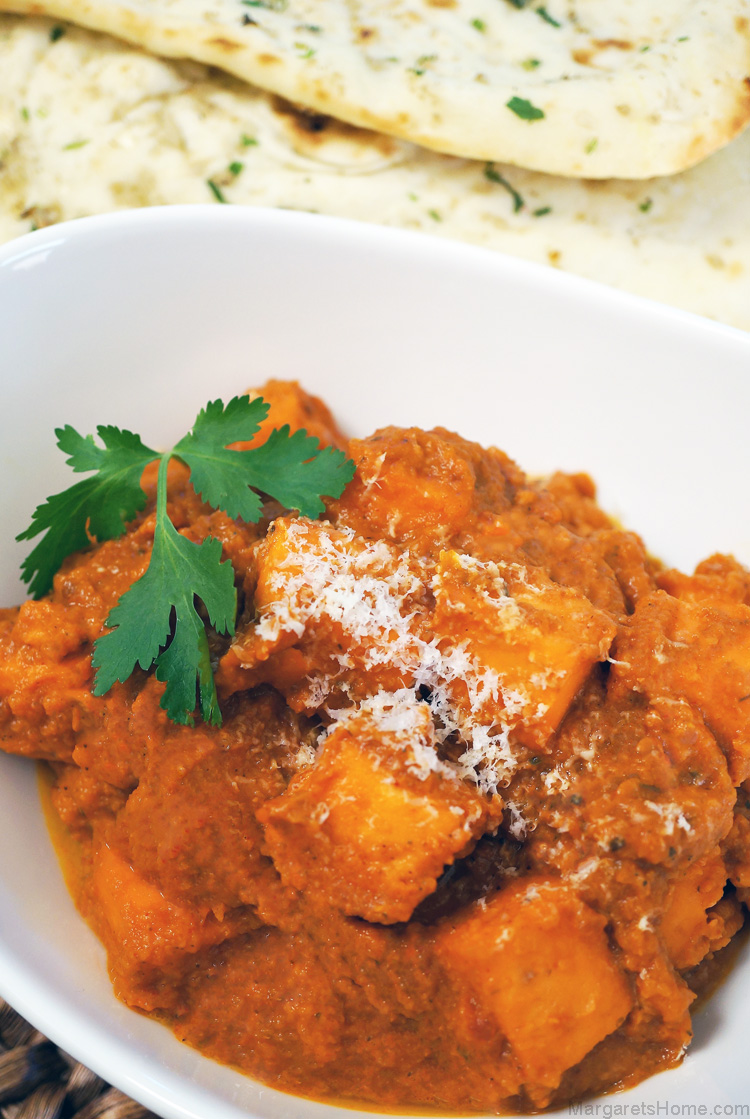
Have you ever been to a restaurant and eaten a dish that you really liked and you wanted to make that dish at home? Well, this is one of those dishes that I really enjoyed in a restaurant in India and wanted to replicate at home. With every bite that I took, I tried desperately to detect what went into it. I also tried many recipes from cookbooks and finally came up with this version of paneer makhani which I felt matched what I tasted at the restaurant.

I recently made this dish for a potluck with my friends and was pleased when they asked me to post the recipe on my blog. The restaurant version had a lot of makhan (butter) floating in it, but I didn’t use as much as they did. Of course, adding an extra pat of makhan just before finishing the dish makes it richer and yummier. But I’ll let you be the judge of whether that is necessary or not when you taste my version.

There is a bit of prep work that goes into making this dish. The paneer needs to be cut into cubes, lightly fried and soaked in hot water. The onions need to be boiled and puréed. The tomatoes need to be blanched, the skin discarded, and then puréed. The ginger-garlic paste can be bought from an Indian grocery store or you can make it at home. I’ve described how to do that in the directions. Cashew nuts need to be soaked in hot water for 30 minutes and then puréed in a blender. Once all the prep work is done and you have all the other ingredients measured and ready to be used, it is easy to put the paneer makhani together. Please note that I made this dish for a large group so it is a larger quantity than I usually make. I hope you will enjoy this dish as much as I do. Happy cooking!

Paneer Makhani
Prep time: 20 minutes
Cooking time: 40 minutes
Serves: 10

Ingredients:
3 cups water
2 14 ounce (400 grams) packets of paneer, cut into cubes
2 tablespoons oil
2 large onions, (quartered, boiled, drained and puréed – 2 cups onion purée)
4 large tomatoes, (blanched, peeled, and puréed – 3 cups tomato purée)
5 tablespoons butter, plus 2 teaspoons oil
2 tablespoons ginger-garlic paste
2 teaspoons Kashmiri chilli powder
1 teaspoon hot red chilli powder
2 teaspoons coriander powder
2 teaspoons cumin powder
¼ teaspoon turmeric powder
3 teaspoons garam masala powder
salt
2 tablespoons tomato paste
1/8 teaspoon red food color, (optional)
2 teaspoons kasoori methi, (dry fenugreek leaves)
20 cashew nuts, (soaked in water for 30 minutes and puréed)
¼ cup whipping cream
2 cubes grated fresh paneer, for garnishing

Directions:
In a medium-sized saucepan, bring three cups of water to a boil, over high heat. Once it comes to a boil, turn the heat off, and set it aside. You will use this to soak the fried paneer.

Set two cubes of paneer aside to be used for garnishing this dish. Fry the paneer cubes in two batches. Add one tablespoon of oil to a non-stick frying pan and place over medium-high heat. Swirl the oil so that it coats the bottom and sides of the pan. Add half the paneer cubes and fry until very lightly colored. Remove and put them into the hot water that you set aside for this purpose. Add another tablespoon of oil to the frying pan and fry the rest of paneer cubes until light brown. Remove and put them also into the hot water. Let the paneer soak until you need to add them to the gravy, and continue with the rest of the prep work.

Cut the onions into quarters, boil them in one cup of water until they turn translucent, drain and save the water as you will use some of it in the gravy. Cool the onion and purée. You should have two cups of onion purée. Set aside. Next blanch the tomatoes in hot water, drain, cool, remove the skin, and purée the tomatoes. You should have three cups of tomato purée. Set aside. If you are making the ginger-garlic paste yourself, clean and chop a two-inch piece of ginger and eight cloves of garlic. Add them to a blender along with one tablespoon of water. Blend until a paste is formed. Set aside. Soak cashew nuts in hot water for 30 minutes and then purée in a blender until smooth. Set aside until you are ready to use it in the paneer makhani.

Heat a large heavy bottomed saucepan over medium-high heat. Add two teaspoons oil and the butter. The oil is being added so that the butter does not burn easily. When the butter melts add the ginger-garlic paste. Fry for three minutes or until the raw smell of ginger-garlic disappears. Add puréed onion. Sauté for eight minutes. Make sure that it does not burn or catch to the bottom of the dish. Turn the heat to medium-low if needs be.

Next, add Kashmiri chilli powder, hot chilli powder, coriander powder, cumin powder, turmeric powder, garam masala powder, and salt. Sauté for a minute and add quarter cup of the water in which the onion was boiled (if you remembered to save it or you can just add water). Sauté again till the water evaporates. Add tomato purée, tomato paste and food color. If you are using powdered food color, first dissolve it in a few drops of water and then add it. Stir, cover with a lid, and cook on medium-low heat for 15 minutes.

Add the cashew paste and crushed kasoori methi. Stir well, cover and cook for another five minutes. Use a slotted spoon to drain the paneer that is soaking in hot water and add them. You don’t need to squeeze the water out of the paneer pieces. Add whipped cream. Stir gently so paneer pieces are coated with the creamy gravy and cook on low heat for five minutes. Dish out into a serving bowl. Grate the two cubes of fresh paneer, that you saved to garnish the dish, and sprinkle on top. There you have it, a restaurant style Paneer Makhani.

Lemon Rice

Lemon RiceNew3

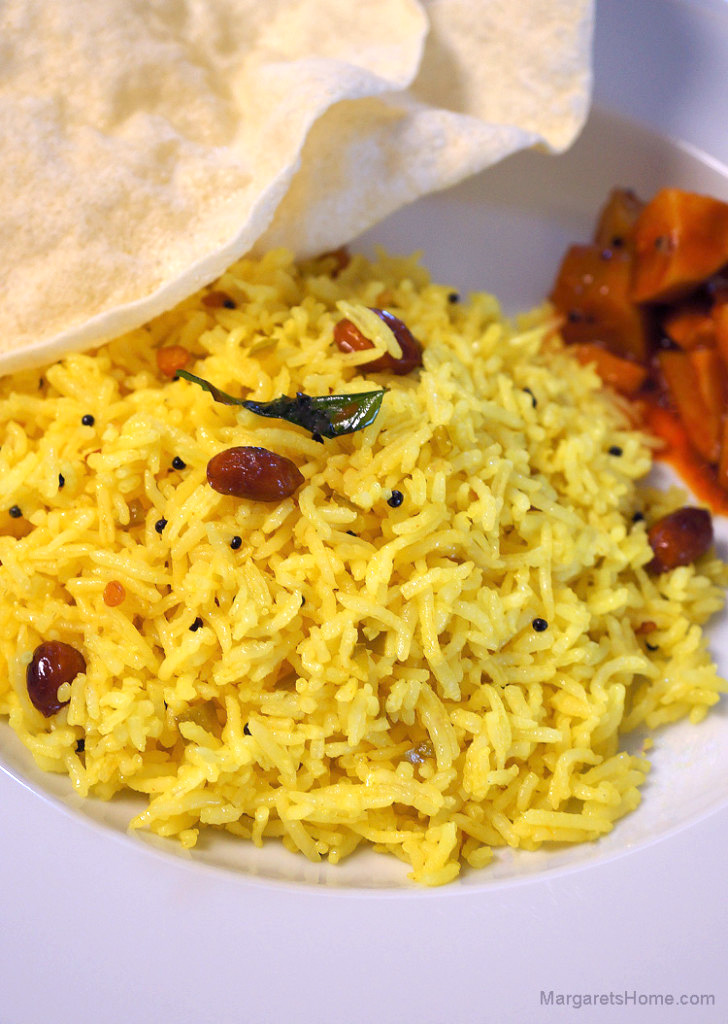
If you like the tart, citrusy note of lemon, I am sure you will like the lemon rice recipe that I am sharing with you today. It is a simple South Indian rice dish that can be made in a jiffy. I remember my mom making lemon rice whenever we went on our long train journey from Pune to Kerala to visit my grandparents. We could hardly wait for mealtime and lemon rice never tasted better. It keeps well and doesn’t spoil so its great for picnics and packing in your child’s lunchbox.

This recipe is also great when you have leftover rice. I’ve used Basmati rice, but you can use any short-grain or long-grain white rice to make it. Sesame oil, green and red chillies, black gram dal and bengal gram dal add flavor to this dish so make sure that you use them. I had to use six tablespoons of lemon juice because my lemon was not tangy enough. So, taste and adjust the amount of lemon juice that you use. Try this dish and let me know how it turns out.

Lemon Rice
Prep time: 5 minutes
Cooking time: 5 minutes
Serves: 2-3

Ingredients:
2 tablespoons sesame oil
½ teaspoon mustard seeds
1 tablespoons Bengal gram dal, (channa dal)
1 teaspoon black gram dal, (urad dal)
3 tablespoons raw peanuts
3 dry red chillies, (broken into bits)
1 tablespoons finely chopped green chillies, (depending on heat and your preference)
1/8 teaspoon asafoetida
1 sprig curry leaves
¼ teaspoon turmeric powder
salt
6 tablespoons lemon juice
2 cups cooked rice, (cool and fluff the rice with a fork to separate the grains)

Directions:
Heat a wok (kadai) over medium-high heat. Add sesame oil and when it shimmers add the mustard seeds. When the mustard seeds splutter, add the peanuts and fry them for two seconds. Next add the Bengal gram dal , black gram dal, red chillies and fry until the dal turns light brown. Add the green chillies, asafoetida, curry leaves, turmeric, salt and fry for one second. Turn off the heat and stir in lemon juice. Finally add the cooked rice. Mix well, cover and keep for 20 minutes so that the rice can absorb the flavor from all the ingredients and the lemon juice. Serve with mango pickle and papadum.

Samosa Chaat

Samosa Chaat3

Just the mention of the word “Chaat” makes my mouth water. Chaat is a word used for many of India’s favorite street foods like bhel puri and paani puri. The last time I was in India I saw a street cart with the sign, “paani puri made with mineral water.” It was nice to see that local vendors are making efforts to make chaat safe for foreigners, or locals-living-abroad, such as myself.

When I was a young girl, during my summer holidays, several schoolmates and I used to go to the Pune Cantonment swimming pool. Right after our swimming session we would stop by the street carts for our fix of samosa chaat, bhel puri, and paani puri. What fun we had! I wonder if anyone of them remembers those days.

On one of our vacations to India my children and I stopped in Mumbai. We went to a restaurant called Status. We heard they were famous for their samosa chaat. We were hungry after a whole morning of shopping. The three of us were ravenous and we ordered a whole bunch of dishes. My son ordered two plates of samosa chaat and the waiter told him that would be too much for the three of us. That one plate along with all the rest of the food that we had ordered would definitely be enough. But my son insisted on two plates. When our food came, we could hardly finish the first plate of samosa chaat. The samosas were humongous! That was a meal in itself. In the background we could hear the waiters whispering to each other with smiles on their faces.

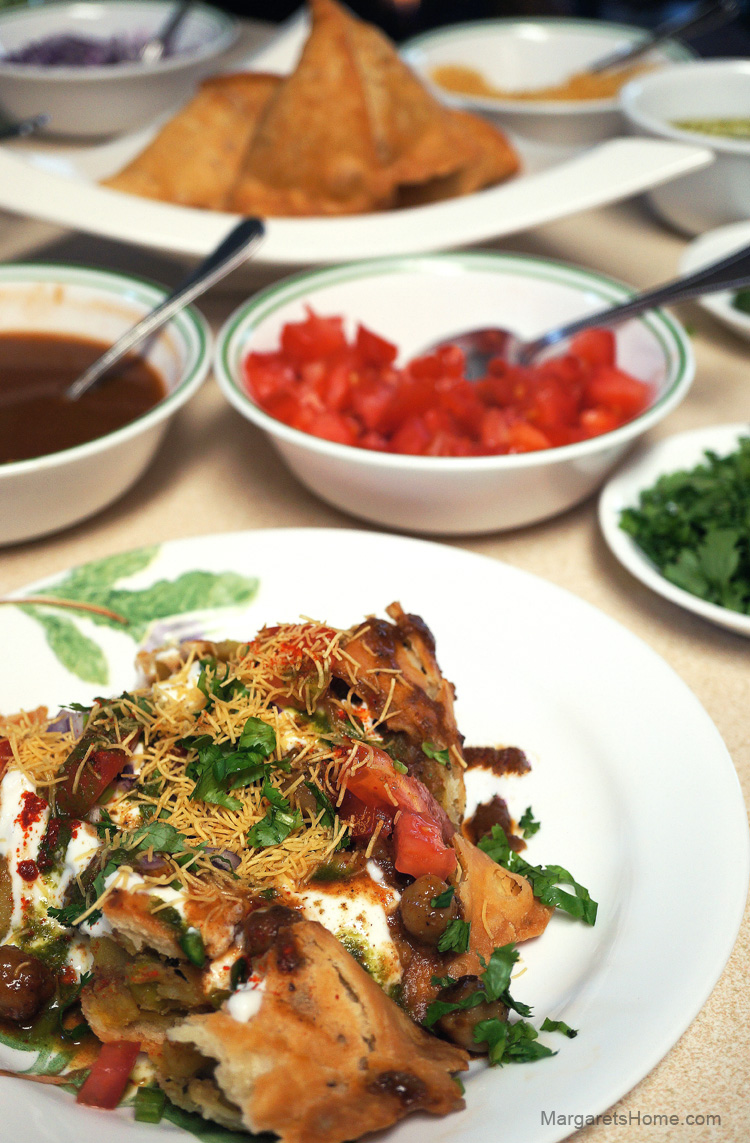
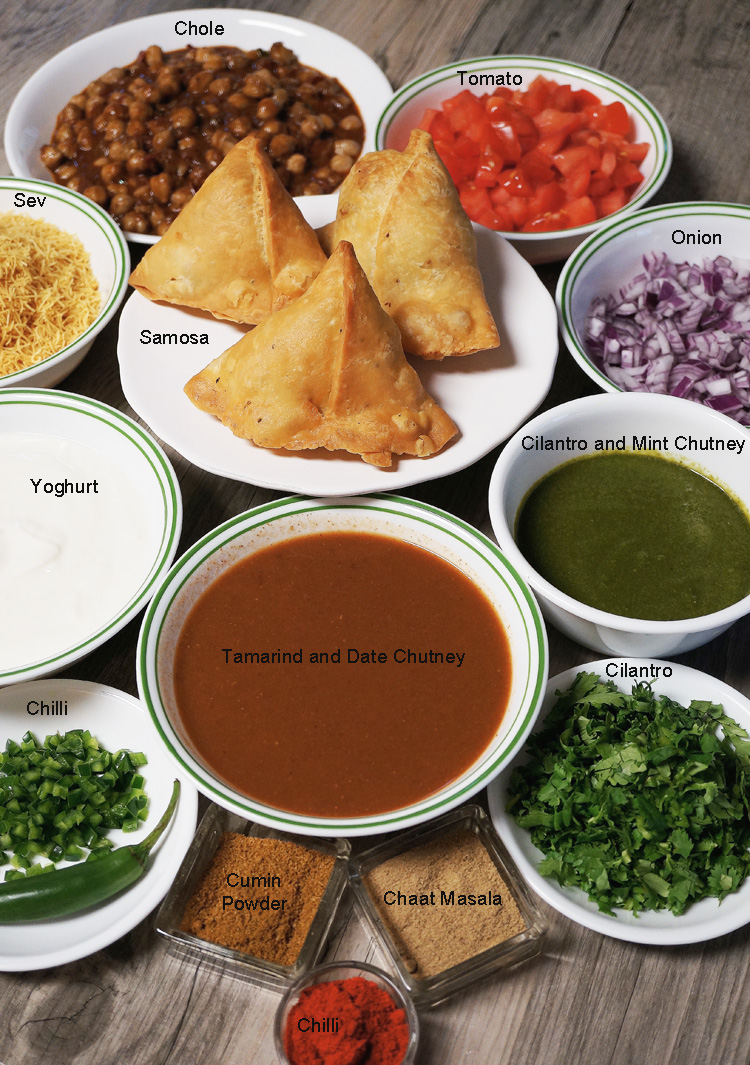
Making samosa chaat at home is a time consuming job, but totally worth it. My friends and family have great fun assembling their own plates of samosa chaat. I made my own samosas but you can buy yours from an Indian store or restaurant. However, it is well worth making the chole, cilantro and mint chutney, and the date and tamarind chutney from scratch as homemade tastes best. So, here is my take on the famous samosa chaat.

If you plan to use dry chickpeas/garbanzo/Kabuli channa follow the Chole recipe from my previous recipe.

Chole – using canned garbanzo beans
Prep time: 10 minutes
Cooking time: 35 minutes
Serves: 6

For the spice mix

Ingredients:
3 tablespoons coriander seeds
4 black cardamoms, peel and use seeds
5 cloves
1-inch piece cinnamon stick
1 teaspoon whole black pepper
1 bay leaf, (tejpatta)
4 whole dry red chillies, (depending on heat and your preference)
2 teaspoons cumin seeds
3 tablespoons pomegranate seeds, (anardana)

Directions:
In a small pan, over low heat, roast the above mentioned ingredients until they smell fragrant and turn a very dark brown. Cool completely and then grind to a powder in a coffee grinder. Set aside.

For the Chole
Ingredients:
3 tablespoons oil
2 cups finely chopped onion
2 tablespoons finely chopped ginger
1 tablespoon finely chopped green chillies, (optional)
1 cup diced tomatoes
2 teaspoons Kashmiri chilli powder
Salt
2 15.5 oz cans of garbanzo beans
3 cups water

Directions:
In a large heavy bottomed saucepan, over medium-high heat, add oil. When the oil begins to shimmer add the onions. When they turn translucent add the ginger and fry for a minute. Add the green chillies and tomatoes. Keep stirring until the tomatoes are well cooked you see the oil separating from the tomato-onion mixture. Add the spice mix, Kashmiri chilli powder, and salt. Fry for 30 seconds.

Add the garbanzo beans along with the liquid in the cans and three cups of water. If you like the chole gravy to be a little thick, use a potato masher to mash a small portion of the garbanzo beans. Bring to a simmer and cook for an additional 30 minutes over medium-low heat, so the flavors can meld. Stir occasionally to make sure that the gravy does not stick to the bottom of the pan. Remove from heat. Serve on top of samosa chaat.

Date and Tamarind Chutney
Prep time: 10 minutes
Cooking time: 10 minutes
Serves: 6

Ingredients:
2 teaspoons cumin seeds
½ teaspoon fennel seeds
1 cup dates, pitted and roughly chopped
½ cup brown sugar
1 cup tamarind extract
3 teaspoons red chilli powder
2 teaspoons ginger powder
3 cups water
2 teaspoons chaat masala
1½ teaspoons black salt

Directions:
Add cumin and fennel seeds to a small non-stick pan. Roast over low heat until fragrant. Cool and grind to a powder.

Add cumin and fennel powder, chopped dates, brown sugar, tamarind pulp, chilli powder, ginger powder, chaat masala, salt and two cups of water to a small saucepan. Place the pan over medium-high heat. Stir and bring to a boil. Turn the heat to medium-low and continue to cook for ten minutes. Cool completely. Add to a blender and process until smooth. Transfer to a bowl. Serve with samosa chaat.

Cilantro and Mint Chutney
Prep time: 5 minutes
Cooking time: 5 minutes
Serves: 6

Ingredients:
1 cup fresh cilantro leaves
½ cup fresh mint leaves
3-4 green chillies, (depending on heat and your preference)
2 tablespoons water
Salt
1/4 tsp sugar
2 tablespoons lemon juice

Directions:
Roughly chop the cilantro, mint, and green chillies. Add to a blender and process until smooth. Use a tablespoon or two of water if necessary. Add black salt and sugar. Blend again and transfer to a bowl. Stir in lemon juice. Serve with samosa chaat

Plating and Garnishing

Ingredients:
12 Samosas, (can be warmed up in an oven at 400 degrees F for 6-8 minutes)
2 cups plain yoghurt, whipped
2 cups fine sev, (can be bought from Indian grocery store)
1 cup finely diced onion
1 cup finely diced tomato
2 tablespoons finely chopped green chillies, (optional)
¼ cup finely chopped cilantro
2 teaspoons roasted and powdered cumin seeds
2 teaspoons chaat masala
2 teaspoons chilli powder

Samosa Chaat4

Directions:
Break two samosas into four or five large chunks and put them on a plate. Pour a large spoonful of chole over them. Scatter a heaped teaspoon of chopped onion and tomato. Add a few bits of green chillies, if you like your chaat to be spicy. Sprinkle with a pinch of cumin, chilli and chaat masala powders. Drizzle a tablespoon of yoghurt, tamarind and date chutney, and cilantro and mint chutney over them. Finally top them off with sev and bits of chopped cilantro. There you have it – one of Indian’s favorite street foods!

Vegetarian Puffs

Vegetarian Puffs1

Some time ago I shared my recipe for Minced Chicken Puffs and many of you told me how much you enjoyed serving these puffs to your friends and family. Some of you asked if I could share a vegetarian version. This recipe is for you.

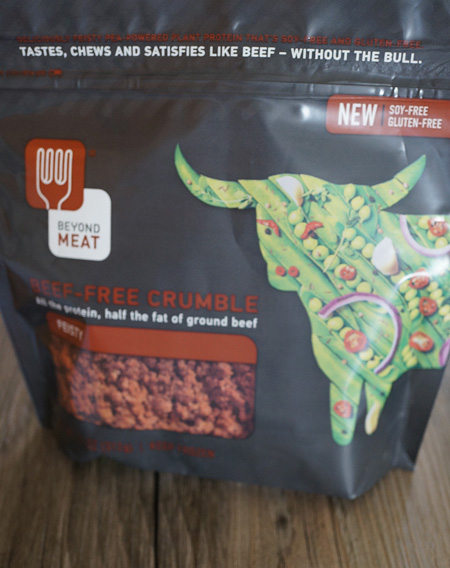
I was at Whole Foods and they were giving out samples of this soy-free, gluten-free, beef-free, cholesterol free, 100% vegan crumble called Beyond Meat. It tasted good so I decided to try it as a filling for my puffs. Beyond Meat is a new soy free, fake meat company. The crumble is made from pea proteins. You could also make the filling with two cups of boiled vegetables like carrots, peas, potatoes and cauliflower instead of the feisty beef-free crumble and the potato that is listed in this recipe. The Shakti meat masala gives the filling a nice flavor.

No, Whole Foods or the company, Beyond Meat, is not paying me to promote these products. I just think the Beyond Meat Beef or Chicken Crumble is a great option for my vegetarian friends. I’ve included a picture of the packet so you can identify it in the freezer section of your Whole Foods grocery store. Try it and let me know how it turns out.

Vegetarian Puffs
Prep time: 10 minutes
Cooking time: 35 minutes
Serves: 6

Ingredients:
1 pkg. (17.3-ounces) Puff Pastry Sheets, thawed
3 tablespoons oil
1 teaspoon cumin seeds
2 cups finely chopped onion
Salt
1 tablespoon finely chopped ginger
1 tablespoon finely chopped garlic
2 teaspoon finely chopped green chillies, (depending on heat and your preference)
2 tablespoons finely chopped cilantro
¼ cup finely chopped tomato
3 teaspoons Shakti meat masala powder, (or any other meat masala powder)
1 medium sized potato
1 11-oz package Feisty Beef-Free Crumble, (available in the frozen section)
2 tablespoons soy milk

Directions:
Thaw the pastry sheets at room temperature for 40 minutes or use the directions on the package. Heat the oven to 400°F. Lightly grease or line two baking sheets with parchment paper.

To make the filling for the puffs, boil the potato until it is fork tender. Remove the skin and dice into small pieces. Heat oil in a small non-stick frying pan over medium-high heat. Add cumin seeds and when they sputter add onion, and salt. Cook onions until they turn translucent. Then add the ginger, garlic, green chillies, and cilantro. Cook for three minutes or until the raw smell of the garlic disappears. Add tomato and the meat masala powder. Let the tomato cook until you see the oil separate from the mixture. Turn the heat to low and add the potato and beef-free crumble. Break up the pieces with your spoon, so there are no large lumps. Cover with a lid and cook for five minutes. Stir to dry out any water that may remain. Remove from heat and cool the filling completely.

To assemble the puffs:
Unfold one pastry sheet on a lightly floured surface.
Cut the pastry sheet into three strips along the fold marks. Gently roll each strip to make it slightly wider.
Cut each strip in half crosswise, making six pastry rectangles.
Place the pastry rectangles onto the baking sheet.
Put one heaped teaspoon of the filling onto each pastry rectangle.
Brush the edges of the pastry rectangles with a little water.
Fold the pastries in half over the filling to form small rectangles.
Brush the tops of the filled puffs lightly with soy milk.
Put the tray in the freezer.
Repeat this process with the second puff pastry sheet.
Bake the puffs for 20-25 minutes or until they are golden brown. Let the puffs cool on the baking sheets on wire racks for 10 minutes. Serve with ketchup or Cilantro and Mint Chutney.

Please note:
There are two pastry sheets in one package. If you do not want to use the second pastry sheet, you can wrap it in parchment paper, put it in a ziplock bag, and freeze it. Or, you can fill the puffs and freeze them individually wrapped in parchment paper. Bake them at 400°F for 30-35 minutes straight from the freezer. No thawing required.

Vegan Puffs Crumble

Kolhapuri Chicken Curry

Kolhapuri Chicken3

By now, all of you know that I love Maharashtrian food. Kolhapur is a city situated in the south west corner of Maharashtra and it can boast that it has one of the areas best cuisines. I featured their famous misal pav in one of my blog posts and I hope you had an opportunity to try it. The city is also known for their traditional leather sandals, called Kolhapuri chappal, and their antique jewelry.

The Kolhapuri chicken curry that I am featuring today is one of my favorites. Adjust the spice level to your taste. I added two types of chillies for this recipe. One to add heat and the other to give the curry its brilliant red gravy. I hope you will enjoy this dish as much as I do.

Kolhapuri Chicken Curry
Prep time: 20 minutes
Cook time: 30 minutes
Serves: 6-8

Ingredients:
½ cup grated dry coconut, (copra)
4 dry red chillies, (depending on heat and your preference)
5 Kashmiri dry chillies, (for color)
1-inch piece cinnamon stick
4 green cardamoms
2 black cardamom
2 teaspoons cumin seeds
1 tablespoon coriander seeds
2 petals of star anise
5 cloves
1 blade mace
1 tablespoon poppy seeds
1 tablespoon sesame seeds
8 black peppercorns
2 pounds chicken, cut into medium sized pieces
2 tablespoons lemon juice
½ teaspoon turmeric powder
salt
¼ cup oil
3 cups finely diced onion
2 tablespoons garlic paste
1 tablespoon ginger paste
½ teaspoon grated nutmeg
¼ cup chopped cilantro leaves
2 cups water

Directions:
For the Kolhapuri Masala:
In a small frying pan, over medium-high heat, roast the grated dry coconut until it turns light brown. Remove and put it into a small bowl. The the same pan, roast the dry red chillies for two minutes. Put them into the bowl. Next, to the same pan, add the cinnamon, green cardamom, black cardamom, cumin seeds, coriander seeds, star anise petals, cloves, mace, poppy seeds, sesame seeds and peppercorn. Roast until fragrant. Add the spices into the small bowl and cool all the ingredients for 10-15 minutes. Then grind to a coarse powder.

For the Kolhapuri Chicken Curry:
Marinate the chicken in one tablespoon of the Kolhapuri masala, lemon juice, turmeric powder and salt for fifteen minutes.

Place a large non-stick pan over medium-high heat. Add oil and the chopped onion. Fry until the onion turns light brown. Add the ginger and garlic paste. Fry for two minutes or until the raw smell of ginger-garlic disappears. Add the marinated chicken and roast until you see brown spots on the pieces of chicken. Add the rest of the Kolhapuri masala, grated nutmeg and coriander leaves. Roast for one minute and then add water. Stir and bring to a boil. Turn the heat to medium-low, cover with a lid and cook for 20-25 minutes or until the pieces of chicken are well cooked and the gravy thickens. Taste and adjust the salt, if needed, and turn off the heat. Serve Kolhapuri chicken curry with steaming hot rice. This is a spicy dish but you can adjust the heat level to suit your taste.

Blueberry Cheesecake and Happy Mother’s Day

Blueberry Cheesecake3

Celebrate Mother’s Day with this luxurious, rich, white chocolate cheesecake with home made blueberry topping. It is definitely worth the time and effort to make this special dessert for your mom.

Blueberry cheesecake has been one of our family favorites for many years. I remember making it for the first time in a 9 by 13 inch pan after tasting it at a restaurant. It was more like a blueberry bar than a cheesecake, but as far as the taste – I couldn’t have been happier. My recipe has evolved since then and it has become decadent with extra calories to go along with it. But Mother’s Day is a good time to have a piece of cheesecake without feeling terribly guilty.

I can’t help but think of my mom while I write this post around Mother’s Day. I have beautiful memories of of her. I remember she used to play catch with me while I ran around a flower bed in my garden. When I think back now, I wonder how she ever found the time to do that while holding a full-time job, cooking every meal, and doing a myriad other tasks that moms have to do. While she made chapatis in the kitchen, she taught me my multiplication tables and spelling. She was strong in her faith and prayed for all her children and grandchildren. We felt protected and loved when we went through difficult times in our lives. Oh, I love her so very much, and wish I could tell her one more time.

Happy Mother’s Day to all the selfless mothers out there. God bless you.

Blueberry Cheesecake
Prep time: 15 minutes
Cook time: 45-50 minutes
Serves: 6-8

Ingredients:
For the crust:

1 cup graham cracker crumbs
½ cup almond flour
2 tablespoons sugar
¼ cup butter, melted

For the topping:
2 cups fresh blueberries
⅓ cup sugar
⅓ cup water plus 2 tablespoons water
2 tablespoons cornstarch
2 tablespoons fresh lemon juice
½ teaspoon vanilla extract

For the filling:

2 packages (8 oz. each) cream cheese, softened
½ cup sugar
2 eggs
1 egg yolk
1 cup white chocolate chips, melted
1 teaspoon vanilla extract

Directions:
Preheat your oven to 350 degrees F. Line the bottom of an eight-inch springform pan with parchment paper.

To make the crust: In a bowl mix graham cracker crumbs, almond flour, sugar and butter. Press onto bottom of the springform pan. Bake for six minutes. Cool completely.

To make the topping: In a saucepan over medium heat, combine the blueberries, sugar and one-third cup of water. Stir frequently, and bring to a boil.

In a small bowl, mix the cornstarch with two tablespoons of cold water. Slowly stir the cornstarch mixture into the blueberries. Simmer until the blueberry topping is thick enough to coat the back of a metal spoon, about five minutes. Remove from heat and gently stir in lemon juice and vanilla. Cool and refrigerate until you are ready to serve the cheesecake.

To make the filling: Beat cream cheese and sugar in large bowl with mixer until creamy.  Add eggs and yolk, one at a time, mixing on low after each just until blended. Add melted white chocolate and vanilla and beat until mixture is smooth. Pour over the crust and bake for 45-50 minutes. Cool completely, run a butter knife gently around the edge of the pan, and refrigerate for four hours or over-night.

Serve slices of cheesecake with whipped cream and blueberry topping.