Reposting – Doughnuts – Indian Style

Doughnuts Usha
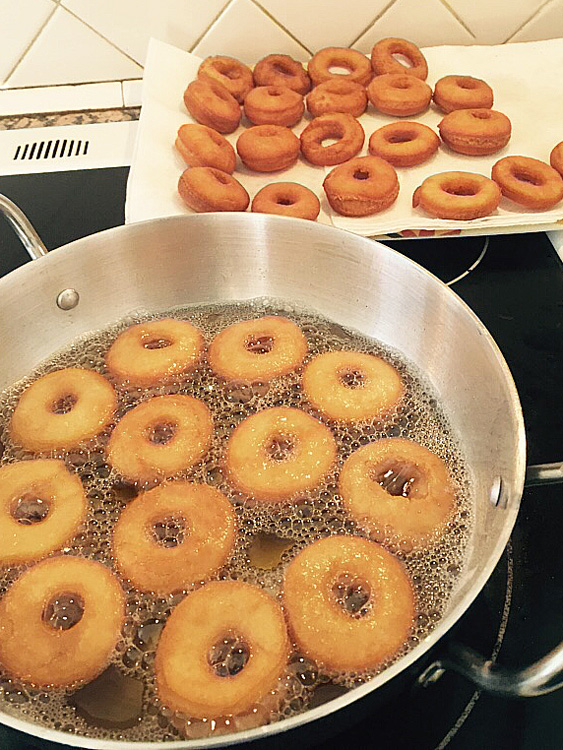
This picture was taken by my friend, Usha David, who made these doughnuts for her family recently. Thank you for sharing this picture with me, Usha.

Doughnuts – Indian Style
Ingredients:
2 cups all-purpose flour, plus more for dusting
1 cup confectioners’ sugar
¼ teaspoon salt
1½ teaspoon baking powder
1 egg
¼ cup vegetable oil or melted ghee
1 teaspoon vanilla
¼ cup milk
Peanut or canola oil for deep-frying
Confectioners’ sugar for dusting

Directions:
In a bowl, sift flour, sugar, salt, and baking powder. In another bowl whisk together egg, oil and vanilla. Add egg mixture into the flour and gently mix until crumbly. Add milk little by little until the dough hold together. Add a few teaspoons of flour if the dough is sticky. Knead until it forms a nice smooth dough. Cover with a damp paper towel, and let it rest for 15 minutes.

Divide the dough into two portions. Turn one portion out on to a lightly floured work surface. Roll out to a ten inch round. Cut using a doughnut cutter which is dipped in a little flour. This helps the doughnuts to slide off the cutter easily. Do the same with the other portion of the dough. Line a platter with paper towels.

In a deep, heavy saucepan, pour in oil to a depth of two inches, and heat. When oil is hot place a few doughnuts at a time in the hot oil. Using a slotted spoon remove doughnuts when they turn golden brown on both sides. Place them on paper towel lined platter to drain. If you like, you can use a fine mesh sieve to dust the doughnuts with confectioners’ sugar.

Shakarpara (Shankarpali) – Indian Biscuits

Shakarpara2
Two days to Christmas! Here’s wishing you and your family a Happy Holiday and a delicious New Year!

Christmas is a great time to build lifelong memories with your family. Keeping up with family traditions takes time, energy, and planning. I am so thankful for the memories I have of my family during this time of year.

I am sure many of you have your own Christmas traditions. Please share them with us on my Facebook page or right here on my blog. A few of our family favorites are decorating the Christmas tree, making treats with friends, having family over for Christmas Eve dinner, Secret Santa parties, and of course, a delicious breakfast on Christmas morning (cinnamon rolls are a must)!

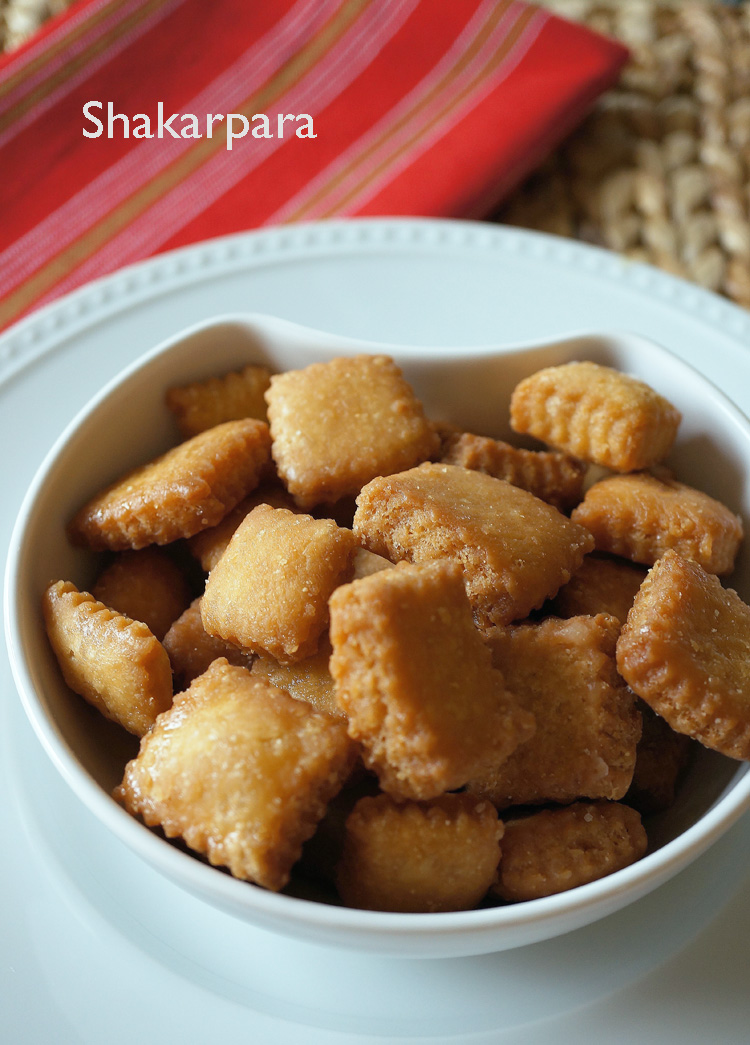
Today’s recipe is simple. You will find these little biscuits all over Maharashtra. Shakarpara or Shankarpali, as they are called, are made with all purpose flour, ghee or oil, sugar, and water. These are items you already have in your pantry. All you need to do is knead the dough, let it rest, roll, cut, and deep fry. So, you can even make them today – just in time for Santa’s arrival!

Shakarpara (Shankarpali) – Indian Biscuits
Prep time: 20 minutes (includes rest time)
Cooking time: 30 minutes

Ingredients:
1 cup granulated sugar
1 cup water
½ cup solid ghee, (or 3/4 cup vegetable oil)
5 cups all purpose flour, (approximately)
1 teaspoon salt
2 teaspoons semolina, (sooji, optional)
Oil for deep frying

Directions:
Add sugar, water, and ghee into a saucepan. Place over medium-high heat and stir until the sugar melts. Cool. Whisk flour, salt and semolina in a separate bowl until combined.

Pour the cooled sugar, water, and ghee mixture into the large bowl of an electric mixer, (Kitchen Aid), fitted with a dough hook. With the mixer on slow speed, add the flour, a little at a time, scraping down the bowl, until the mixture comes together. I needed five cups of flour. You might need to add a little more or a little less. Add flour until the mixture comes together into a ball. Turn the mixer on medium speed and knead for three minutes. You can also made the dough without a mixer. Knead with your hands until you have a smooth dough. Let the dough rest for 15 minutes. Knead it again with your hands and then divide the dough into equal portions. Roll to about 1/8 inch thick. Cut into diamond or square shapes.

Add about five inches of oil to a wok or heavy bottomed pan. Heat the oil over medium heat. Then turn the heat to medium-low. Add a small piece of dough. If it rises to the top quickly the oil is too hot. Add a few shakarparas at a time. They must come up slowly. Fry them on low heat so the inside cooks well. Remove when they turn golden brown and drain on paper-towel lined trays. Cool completely before storing them.

Notes:
– I used turbinado sugar for the shakarparas in the picture. The golden crystals are not bleached, so they keep the rich flavor and color of their natural molasses. But I found that the shakarparas were not as sweet as I would have liked, so I coated them with a sugar syrup.
– For the sugar syrup I used one cup granulated sugar and one cup water. Cooked it in a heavy-bottomed pan, over medium heat. When the sugar melted, I add quarter teaspoon lemon juice. The lemon juice keeps crystals from forming. Boil until the sugar reaches one-thread consistency. To do this, keep testing the syrup. Dip a wooden spoon into the syrup and lift out. Allow it to cool. Touch it with your forefinger and then touch your thumb and gently pull apart. When a single thread is formed and it does not break, you’ve reached one-thread consistency. Or use a candy thermometer (234° F–240° F).
– Dip the shakarparas in the syrup, drain the excess syrup with a slotted spoon, and put them on a large cookie sheet. They need to dry out before you store them.
MargaretsHome.com turns TWO
Let’s celebrate with Rasmalai

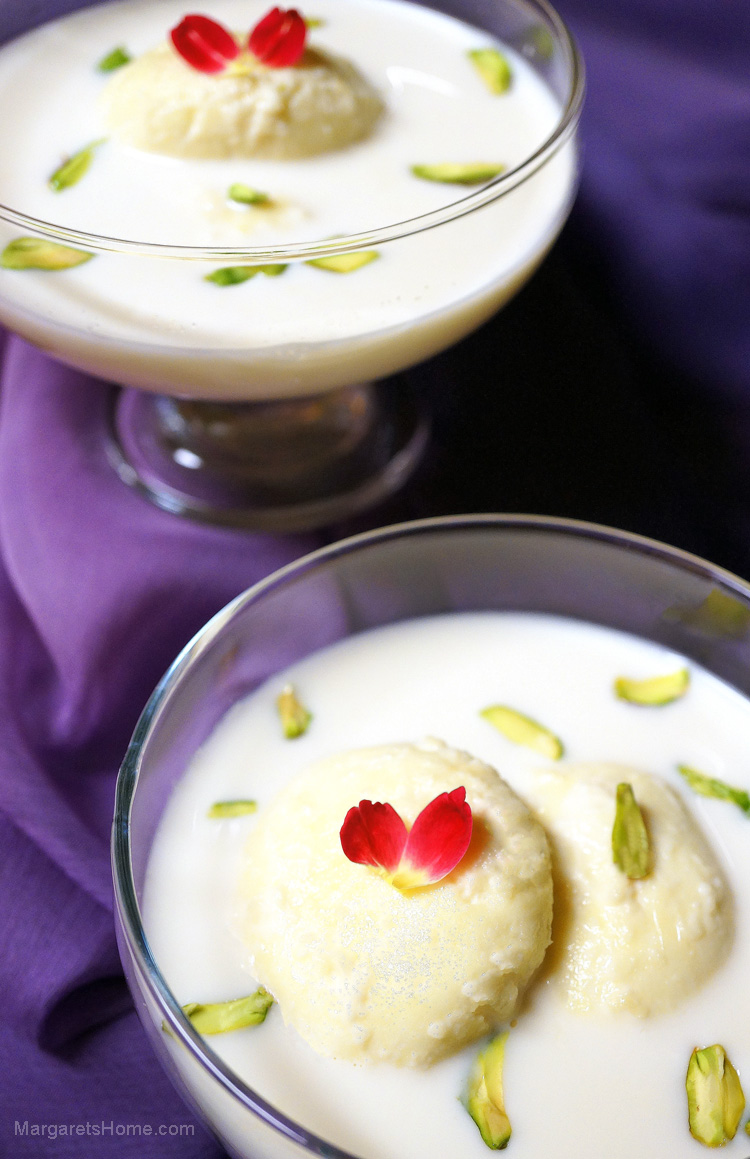
Rasmalai8newI cannot believe I’ve been blogging for two years! That’s 104 posts. My sincere thanks to each one of you who has visited my blog during these past two year. MargaretsHome.com had 38,883 views and 528 comments. Your feedback is important to me. When you call to ask a question or when you tell me that you’ve tried my recipe and it worked out well for you, it makes my day! MargaretsHome.com would not be the same without you. Please continue to visit and I hope I can inspire you to cook some incredible dishes at home. I’m celebrating this milestone with one of my favorite desserts – Rasmalai.

Rasmalai is sometimes spelled Ras Malai. Ras means juice and malai means cream. Wikipedia describes rasmalai as a rich cheesecake without a crust. The recipe that I’m sharing with you is less complicated than the version used by authentic sweetmeat shops in India. In my version, the soft, spongy, cardamom-flavored balls are made with milk powder. Sugar and whole cardamoms are added to whole milk. Then it is boiled and simmered until it becomes thick and rich. The rasmalai balls are then cooked in it until they double in size. Rasmalai is served with some of the sweet, creamy milk sauce and garnished with pistachios.

Rasmalai can been made out of paneer (Indian cheese), ricotta cheese, or powdered milk. I’ve experimented with all three ingredients several times and feel that this recipe is quick, easy and delicious. Adjust the amount of sugar that is added to the milk according to your taste. I’ve tried to give you detailed directions so that the rasmalai will turn out perfectly when you make them for the first time. Follow the instructions carefully and you will have success.

I will be taking a short break from blogging as I am going on vacation. I’m sure my travels will yield even more exciting food experiences and recipes to share with you.

Rasmalai
Prep time: 5 minutes
Cooking time: 40 minutes
Serves: 5

Ingredients:
6 cups whole milk
½ cup sugar, (depending on your taste)
5 whole cardamoms
1 cup Nestle’s Nido full cream milk powder
½ teaspoon all purpose flour
½ teaspoon baking powder
1/8 teaspoon cardamom powder, (optional)
2 teaspoons melted ghee
1 egg, (at room temperature)

Directions:
Pour the milk into a heavy-bottomed, wide, stainless steal pan. Add sugar and whole cardamoms. I cracked open the pods a bit, but you can leave them whole. Bring the milk to a boil over high heat and then turn the heat to medium-low and simmer for 15 minutes. Stir occasionally to avoid the milk sticking to the bottom of the pan.

Sift the milk powder, flour, baking powder, and cardamom powder into a large mixing bowl. If you don’t like the cardamom specks in the rasmalai, skip adding it. But it adds a wonderful flavor to the rasmalai. Add ghee and rub it into the milk powder mixture with your fingertips. In a small bowl, beat the egg lightly with a fork. Add one tablespoon at a time into the milk powder mixture and mix with your fingertips to form a soft and slightly sticky dough. Don’t knead, just bring the whole mixture together into a ball. I used about three and a half tablespoons of egg. Cover with a towel and let it rest for two minutes. If the mixture feels dry add a teaspoon of egg. Add one teaspoon at a time. Take small pieces of the dough and make them into small marble sized balls. Flatten them just a little and put them on a plate.

Bring the milk to a boil again and then immediately turn the heat to low and allow the milk to simmer. Add all the rasmalais into the milk. Cover the pan with a tight fitting lid and let the rasmalai cook for five minutes. Remove the lid after five minutes and gently turn each rasmalai over. Cover and let them cook for another 10 minutes. Take one rasmalai out and check if it is done. Place the rasmalai in a bowl and cut it in half. See if the rasmalai is cooked and looks spongy inside. If not, you need to cook them for another five minutes. When they are done, turn off the heat and leave the rasmalai covered for ten minutes at least. Then gently transfer them into a serving bowl. Let them cool and then chill them overnight in the refrigerator. Garnish with slivered pistachio and serve.

Boondi Ladoo

Boondi Ladoo2

Happy Diwali to my readers and friends who celebrate the Indian Festival of Lights. May the new year bring you and your family prosperity, good health, and happiness.

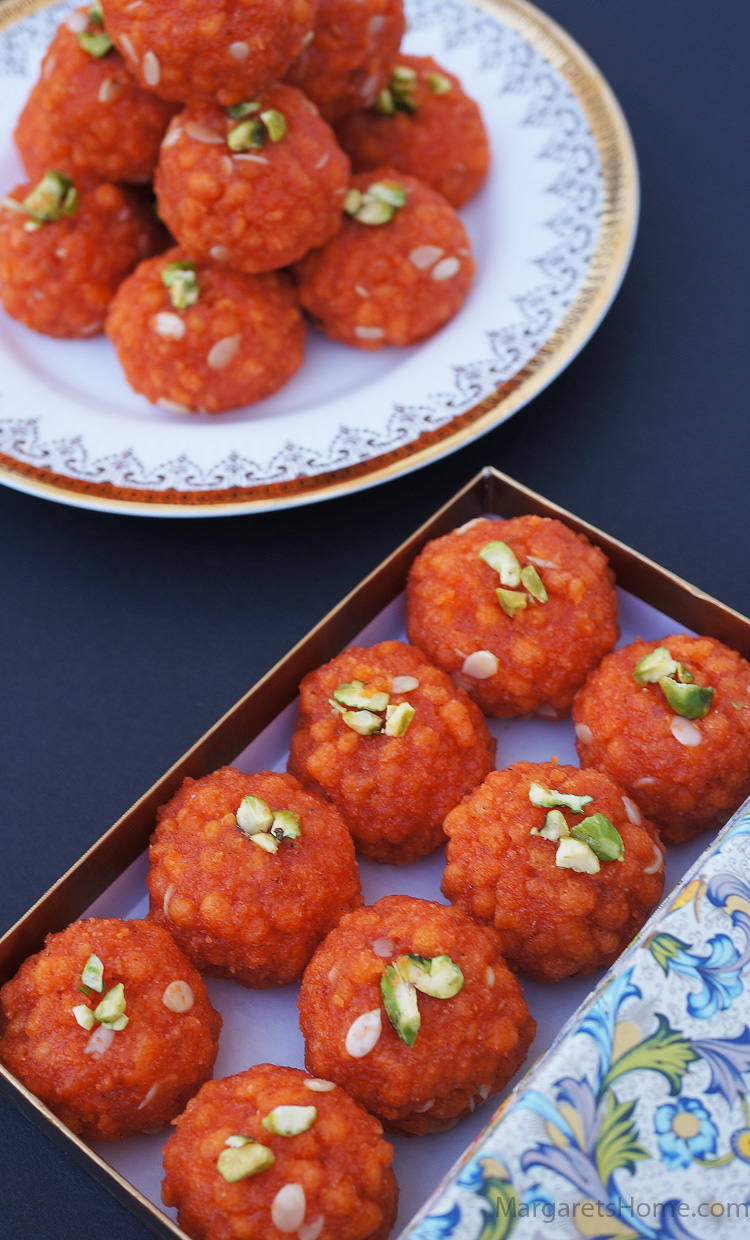
When I walked into my local Indian grocery store the shelves were full of Indian sweets. My mouth was watering and memories of my time in India flooded my mind. I remember oil lamps on the porch of almost every home, firecrackers lighting the skies, children dressed is new outfits, neighbors sharing sweets with each other, and the aroma of wonderful sweets being prepared wafting in the air. Right then I decided to make boondi ladoos and bought all the ingredients I needed and headed for my kitchen.

Boondi ladoos are not the easiest to make but if you have patience, pay close attention to the measurements of the ingredients, read the instructions and notes carefully, you too can make boondi ladoos that you can enjoy and share with your friends. You will also need a boondi maker (to make the small balls, which are called boondi in Hindi, that collectively make each ladoo) or a skimmer – a flat ladle with holes in it to make the boondi. The Indian grocery stores in the U.S. carry it. I added a twist to the fragrance and taste of these boondi ladoos with orange blossom water and red rose water. I hope you will enjoy my version of boondi ladoo.

Boondi Ladoo
Prep time: 15 minutes
Cooking time: 35 minutes
Makes: 20

For the boondi:
2 cups Bengal gram flour, (besan)
1 pinch of baking soda
1 pinch salt
1 pinch of orange food color powder, (optional)
1¼ cups water
Oil for deep frying
2 tablespoons lightly roasted melon seeds
1 tablespoon chopped pistachios

For the syrup:
2 cups sugar
1½ cups water
2 pinches of orange food color powder, (optional)
1 teaspoon orange blossom water
1 teaspoon red rose water
1 teaspoon of cardamom powder, (optional)

Sift gram flour, baking soda, salt and food color into a large bowl. Add half the water and mix with a wooden spoon. Add the rest of the water a little at a time and stir until the batter is smooth. The batter is the right consistency when it drops through the holes of the skimmer easily. Let the batter rest while you make the syrup.

In a large pan combine sugar and water and boil for 15 minutes over medium heat. Brush the sides of the pan with water as it is boiling, so that the sugar does not crystallize and use a candy thermometer. The syrup is ready when the thermometer reads 220 F. Another way to check whether the syrup is ready, if you don’t have a candy thermometer, is when you touch a drop of cooled syrup between your forefinger and thumb, a thin string is formed. Turn off the heat. Add food color, orange blossom water, rose water, and cardamom powder. Add the melon seeds and stir well.

Heat oil in a wok to 350 F. Pour a small amount of batter on the skimmer and tiny droplets of the batter will fall through the holes in the skimmer, into the oil, and form boondis. Hold the skimmer about two inches from the oil to form round boondis. Of course, you need to be careful when you do this. As soon as the bubbles stop forming around the boondis (the boondis should not be crisp and turn brown) drain the oil with a slotted ladle and put them into the syrup. Stir them every time you put a new batch of boondis into the syrup.

Mix until all the boondi and melon seeds are well coated with syrup. When the mixture is cool enough to handle make ladoos. Garnish with chopped pistachios.

Notes:
– If the batter is too thick the boondi will be flat. Add a few drops of water at a time to get the batter to the right consistency so the boondis will be round.
– Hold the skimmer about two inches from the oil, otherwise your boondi will have tails.
– You will see black specks on the ladoos if you add cardamom powder. So you can avoid that by just using the orange blossom water and red rose water.
– Start making the ladoos as soon as possible. If you let the mixture get cold you will not be able to form ladoos.
– You can also put the boondi and syrup mixture into the bowl of a stand mixer with a paddle and run it for about five minutes. If the mixture does not come together to form a ball, add 5-6 tablespoon of boiling hot water, while the mixer is on and run it for another five minutes.